

— Blogs —
—Products—
 Consumer hotline +8618073152920
 WhatsApp:+8615367865107
Address:Room 102, District D, Houhu Industrial Park, Yuelu District, Changsha City, Hunan Province, China
Technical Support
Time:2025-04-10 21:24:42 Popularity:1562
This page (https://docs.thinger.io/mqtt) explains how to connect Niubol devices to the Thinger.io platform via the MQTT protocol. MQTT is a lightweight publish/subscribe messaging protocol, well-suited for communication between IoT devices and platforms. Below, I will summarize the content of the page and provide a step-by-step guide on how to connect your device to the Thinger.io platform using MQTT.
This article will detail how the NiuBoL sensor, through a data logger (gateway/data recorder), uses the MQTT protocol to connect to the Thinger.io platform. Thinger.io supports the MQTT protocol, allowing devices to communicate with the platform by publishing (Publish) and subscribing (Subscribe) to messages. Devices need to use specific MQTT topic formats and authenticate through a device token. This article will also explain how to configure the MQTT client, connect to Thinger.io's MQTT server, publish and subscribe to data, and manage device properties, resources, and callbacks.
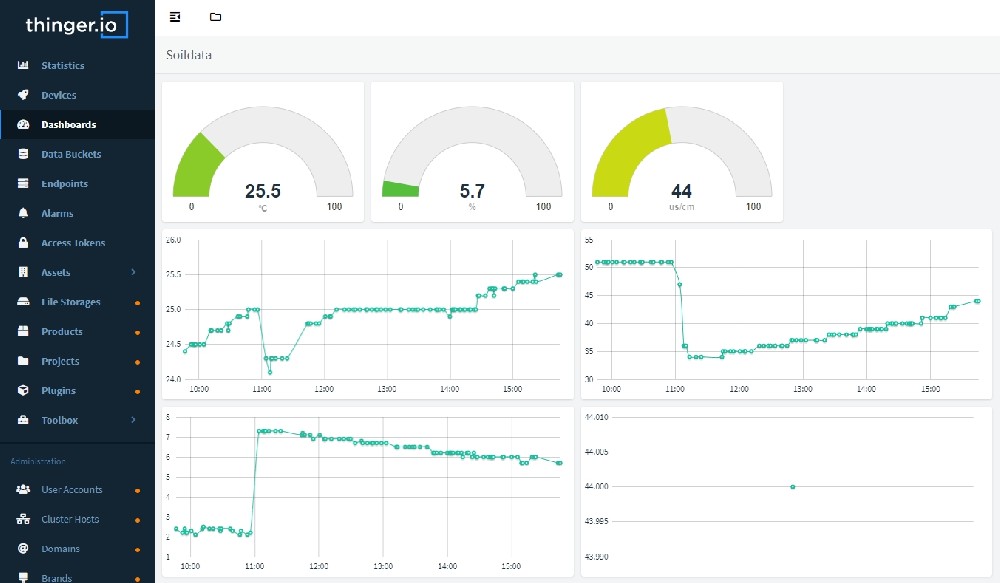
- You already have a Thinger.io account. If not, please register.
- Your device supports the MQTT protocol.
- Open your browser, visit Thinger.io, and log in using your username and password.
- In the left menu, click "Devices."
- Click the "Add Device" button.
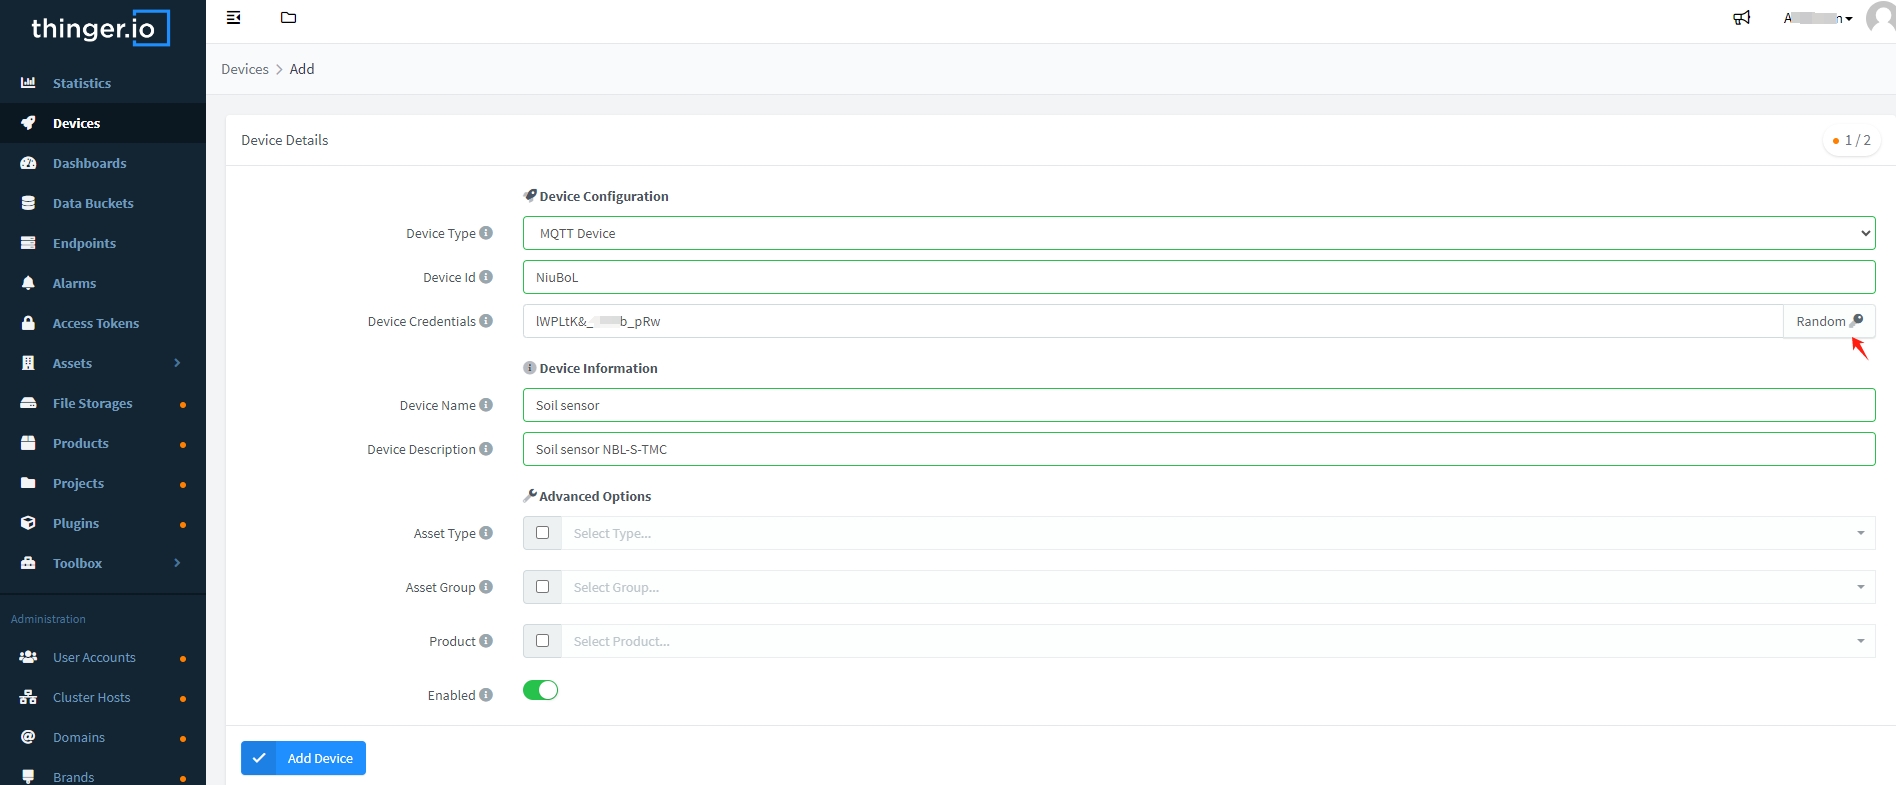
- Device Type: Select "MQTT Device."
- Device ID: Enter a unique device name, e.g., "NiuBoL."
- Device Credentials: This is the device security password, which can be randomly generated using the button at the bottom. Copy and save this token for later use.
- Description: Optional, fill in a description like "My MQTT device," I used "Soil sensor NBL-S-TMC."

- Click "Add Device" to save.

After creating the device, you can click to enter the device to set up or change its password.
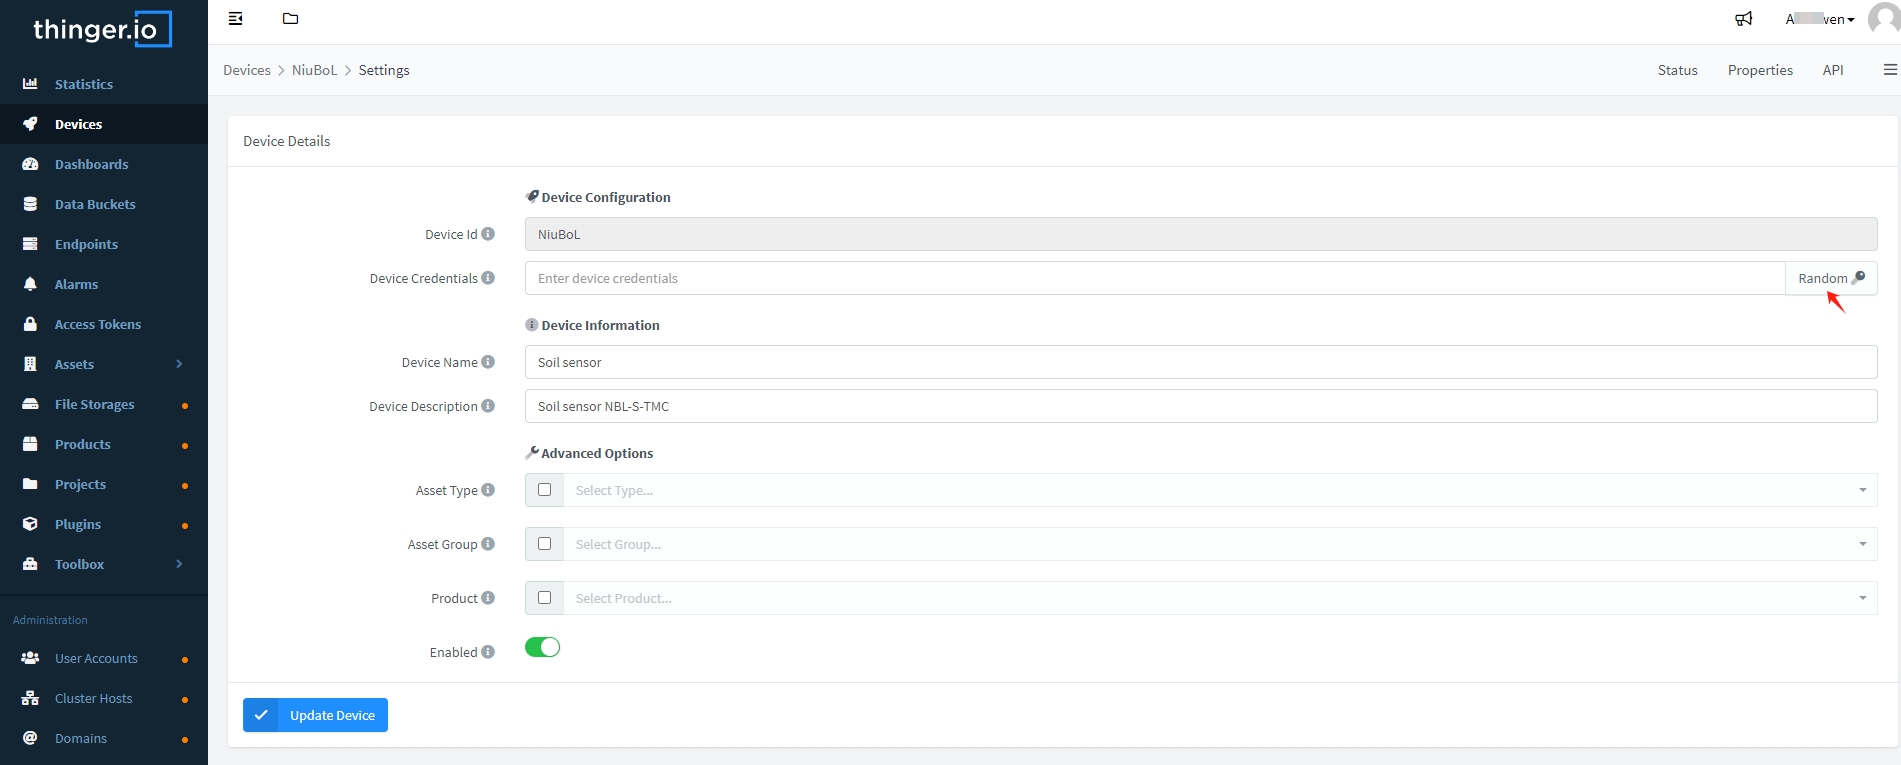
Notes:
- Device Type: "MQTT device" should be selected.
- Device Identifier: Must be unique among your devices.
- Device Description: Additional information to help identify each device.
- Device Credentials: This is the device security password, which can be randomly created using the button at the bottom.
When all information is entered, pressing the "Add Device" button will create a new device profile in the device list. If everything is correct, indicating that the Thinger.io platform is ready to receive data from your MQTT devices.
- Create a new dashboard and set up the necessary information.
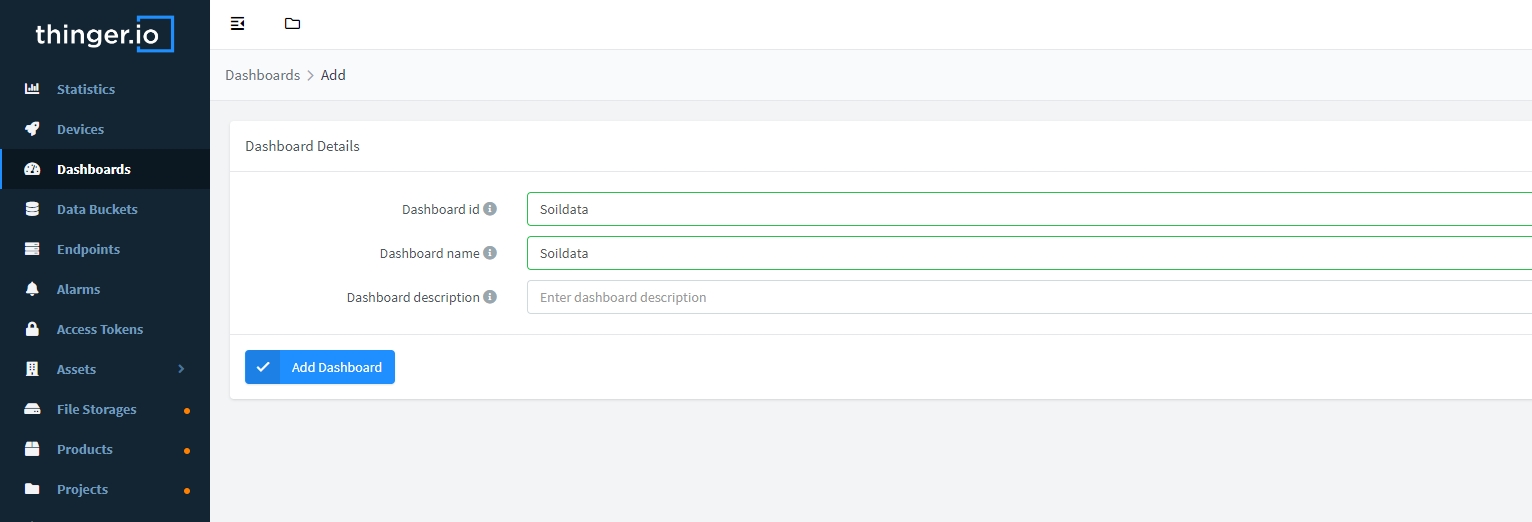 Adding a Dashboard and setting up related information

- Once the dashboard is created, you can proceed to display data.
- In the Thinger.io device dashboard, create a data bucket, such as "Soildata" or "Weatherdata," or customize it according to your preference.
- In the device settings, configure it to store the incoming MQTT data in the bucket.
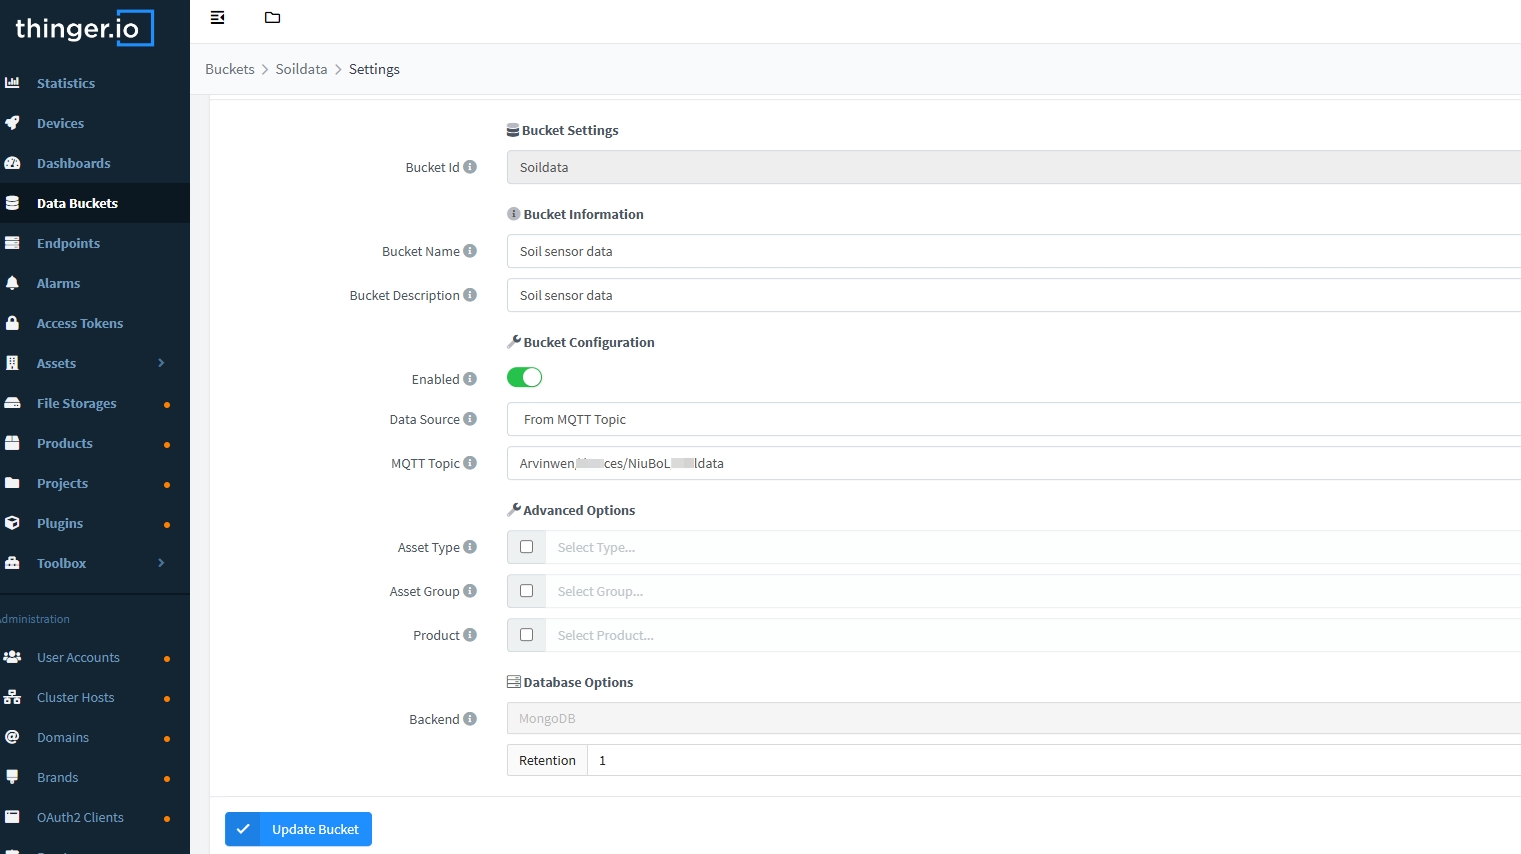
- Bucket ID: A unique identifier for the bucket, e.g., "Soildata" or "Weatherdata."
- Bucket Name: Use a representative name, like "Weather Data" or "Soil data" or the project name.
- Bucket Description: Provide any additional details, like "Soil sensor data."
- Enabled: Toggle data bucket recording on or off. Turn it on to enable it.
- Data Source: Typically defines the Thinger.io device or resource subscribed by the server. In this case, you should select "From MQTT Topic."
- MQTT Topic: Enter the MQTT topic that will be subscribed to by the server.
- MQTT Topic: yourusername/devices/NiuBoL/Soildata
This way, Thinger.io will configure the platform as an MQTT broker but also as a topic consumer, allowing additional features. The client must send data in JSON format.
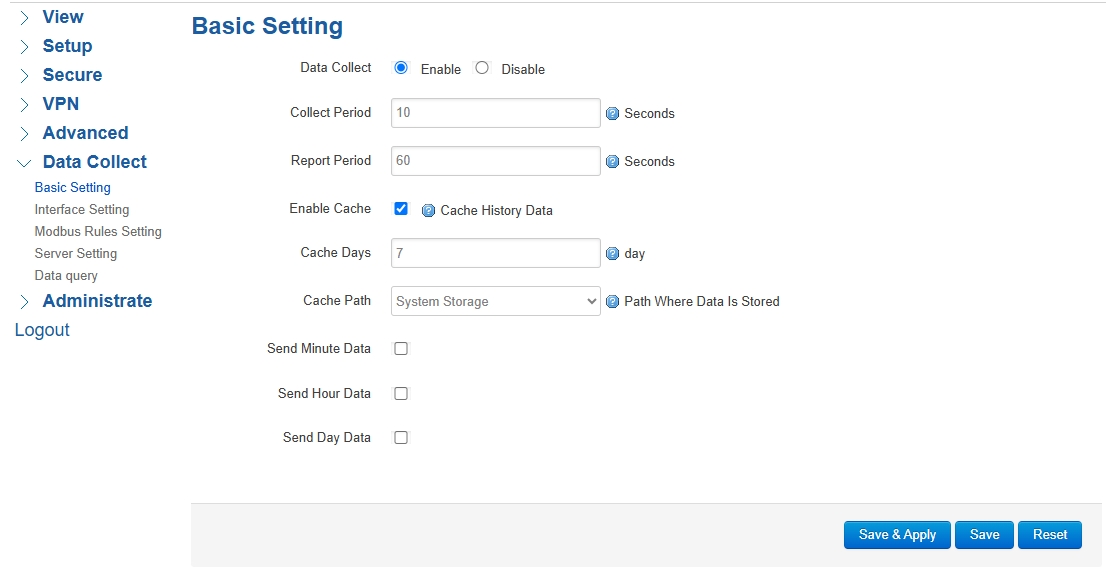
Basic Settings: Set the Collect Period and Report Period according to your needs.
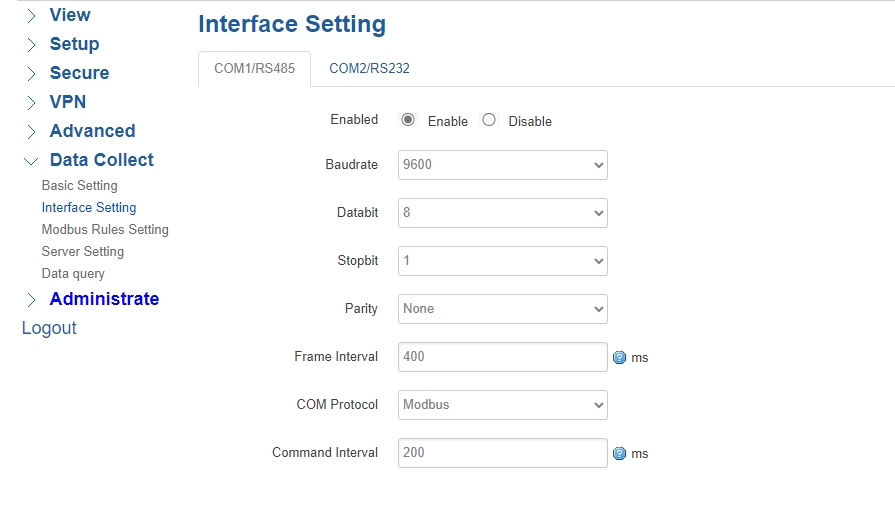
Interface Settings:
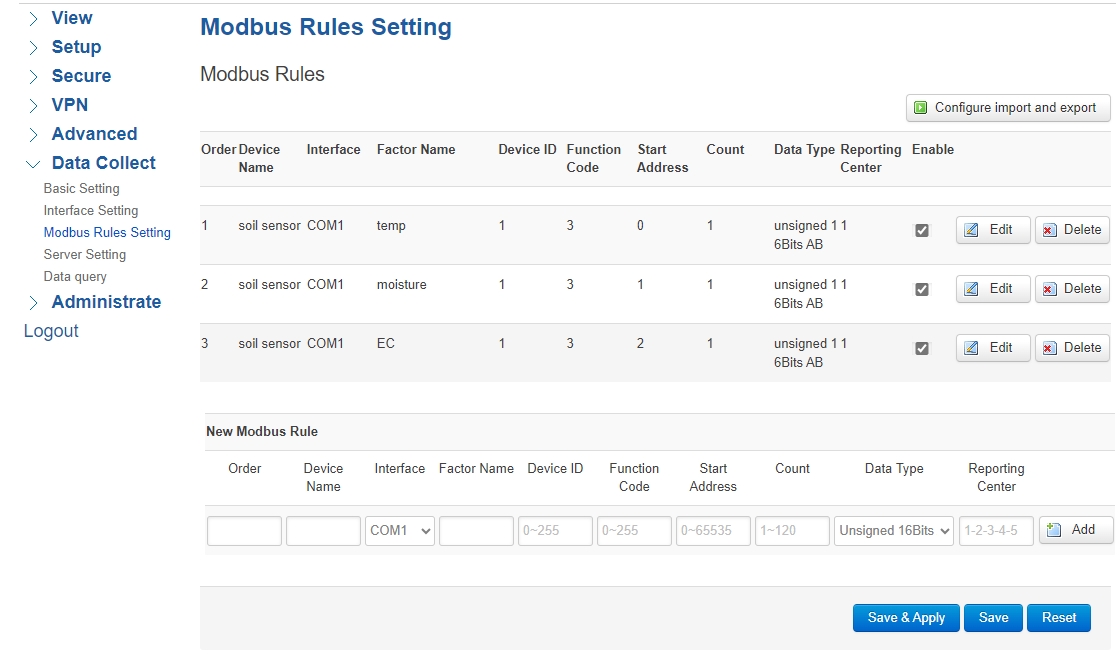
Modbus Rules Settings: Refer to the specific sensor data table.
Set Sensor Output Units and Precision.

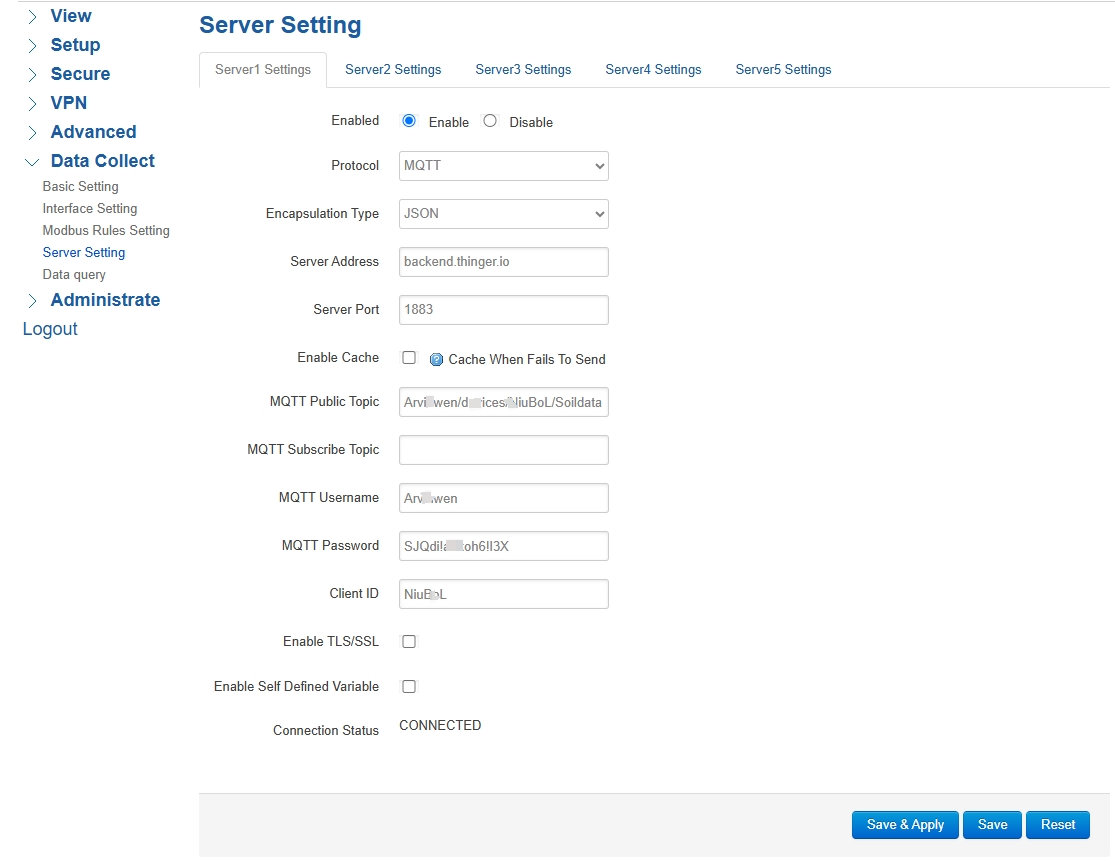
- Communication Protocol: MQTT
- Encapsulation Type: JSON
- Server Address: backend.thinger.io
- Port: 1883
- MQTT Public Topic: yourusername/devices/NiuBoL/Soildata
- MQTT Subscribe Topic: Can be empty
- MQTT Username: yourusername (your Thinger.io username)
- MQTT Password: This is the Device Credentials password.
- Client ID: The device identifier that was configured in the device form, such as "NiuBoL"
- Broker Address: backend.thinger.io (without the http:// part)
- Broker Port: 1883 for non-secure connections, or 8883 for SSL/TLS
- Username: yourusername (not your email address).
- MQTT Public Topic: <username>/devices/<deviceID>/<resource>
- MQTT Subscribe Topic: Can be empty
- MQTT Password: Must match the password you placed in the "Device Credentials" field on Thinger.io.
- Client ID: The device identifier you set up at the device form.
- Start the client and check if the connection is successful.
- If the connection fails, check:
- Whether the username and password are correct.
- Whether the network is working (check if port 1883 is blocked by the firewall).
- Go back to Thinger.io and enter the "Soildata" dashboard.
- Check whether data has been received in "Device Properties" or "Data Buckets."

Once the device is online, it indicates a successful connection.
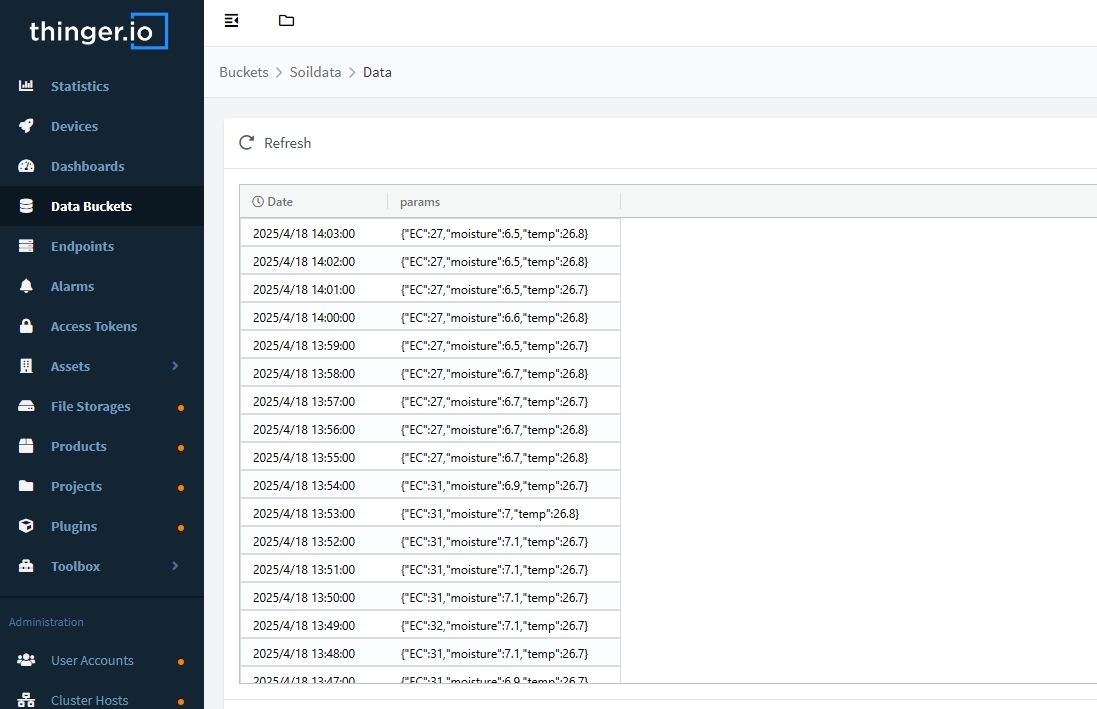
You can check the Data Buckets to see if data is being received.
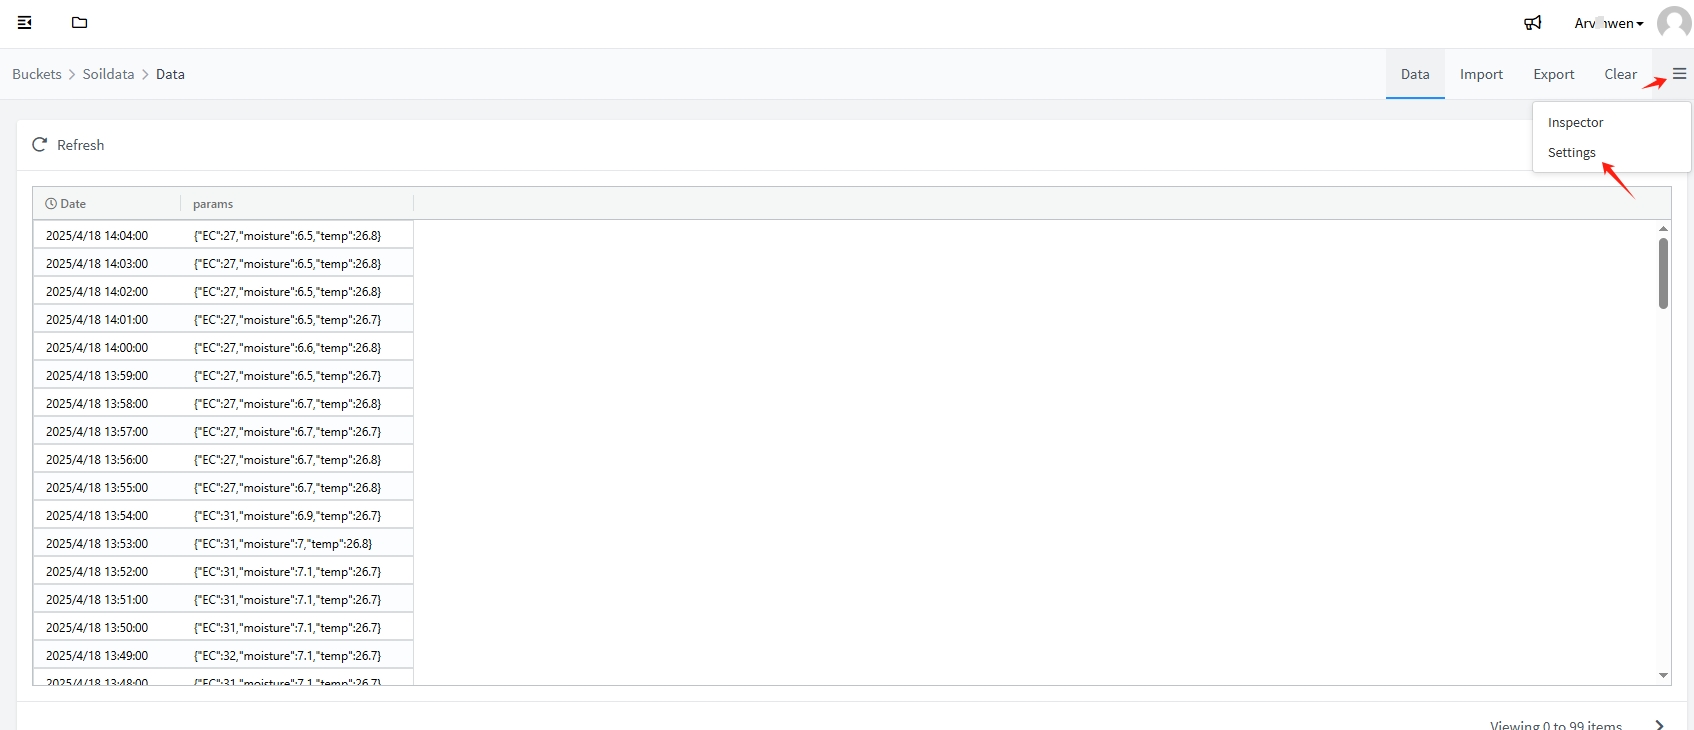
If you need to change the password, you can set it in the Data Buckets settings. No action is required if you do not need to modify it.
- Create a dashboard (Dashboard), add charts, and bind them to the Data Buckets to view the data in real-time.
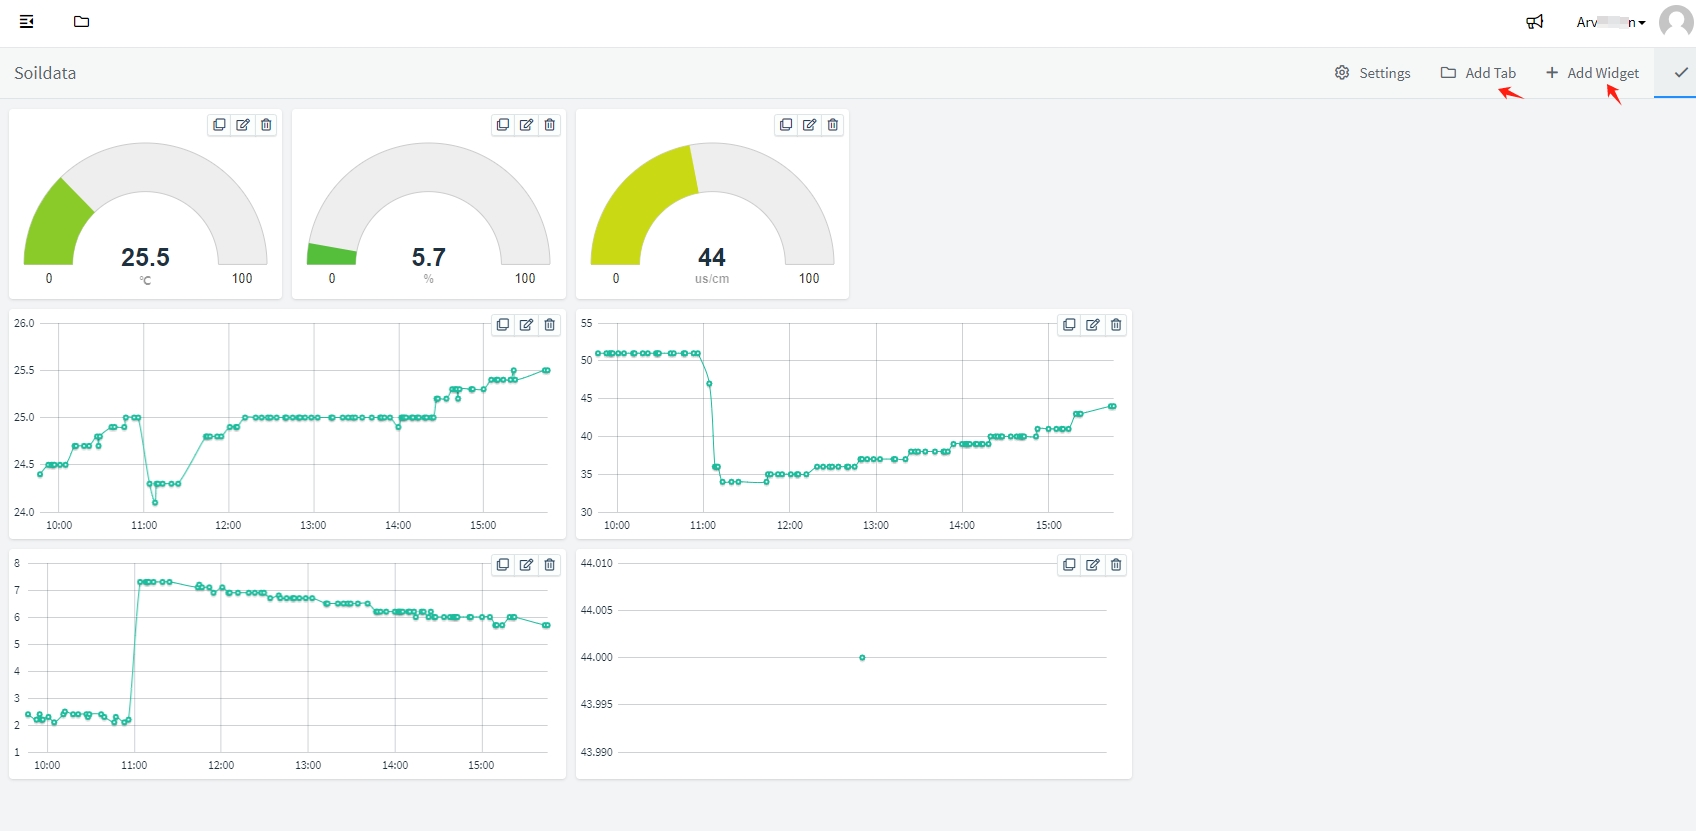
- Add a Tab or Widget.
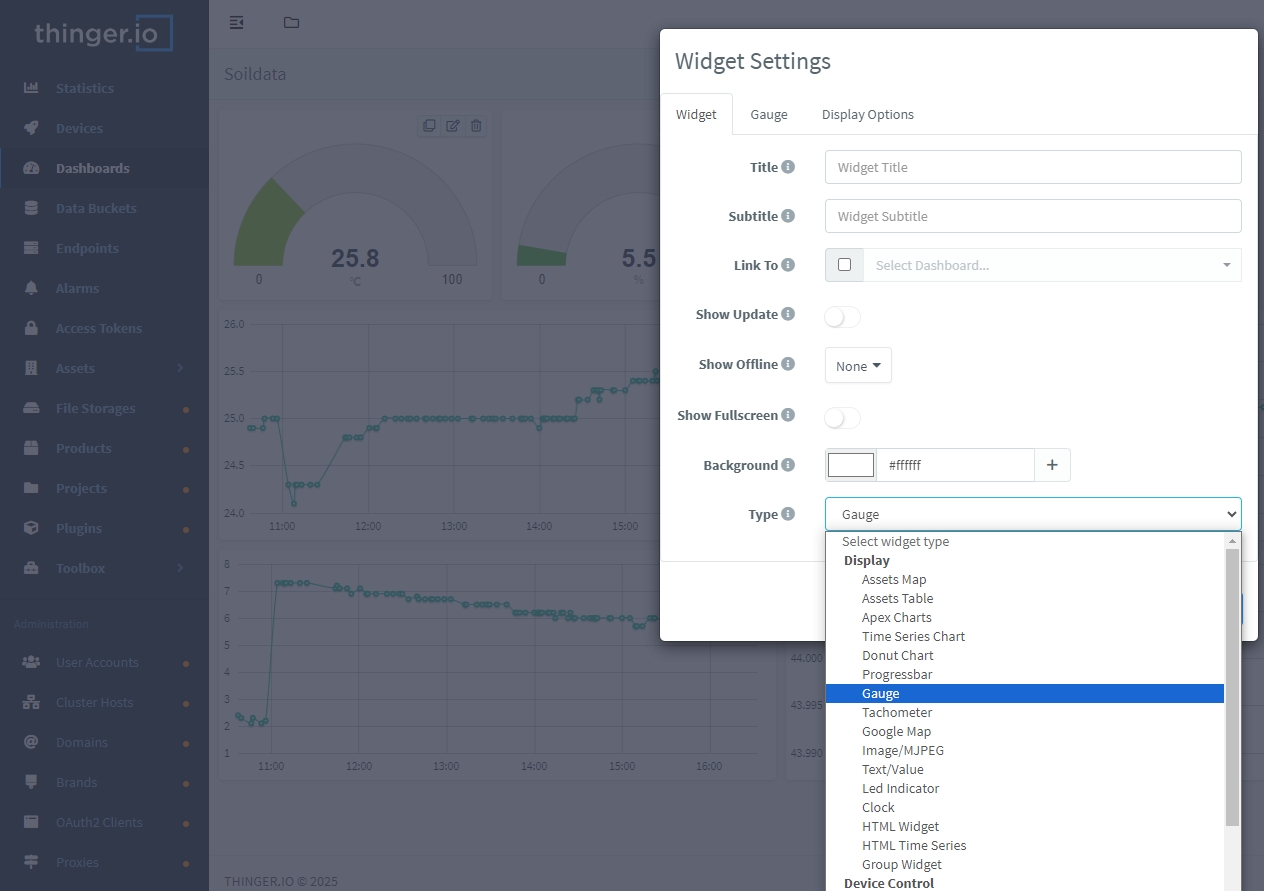
- Choose the type of Widget.

- Select the data source for the Widget.
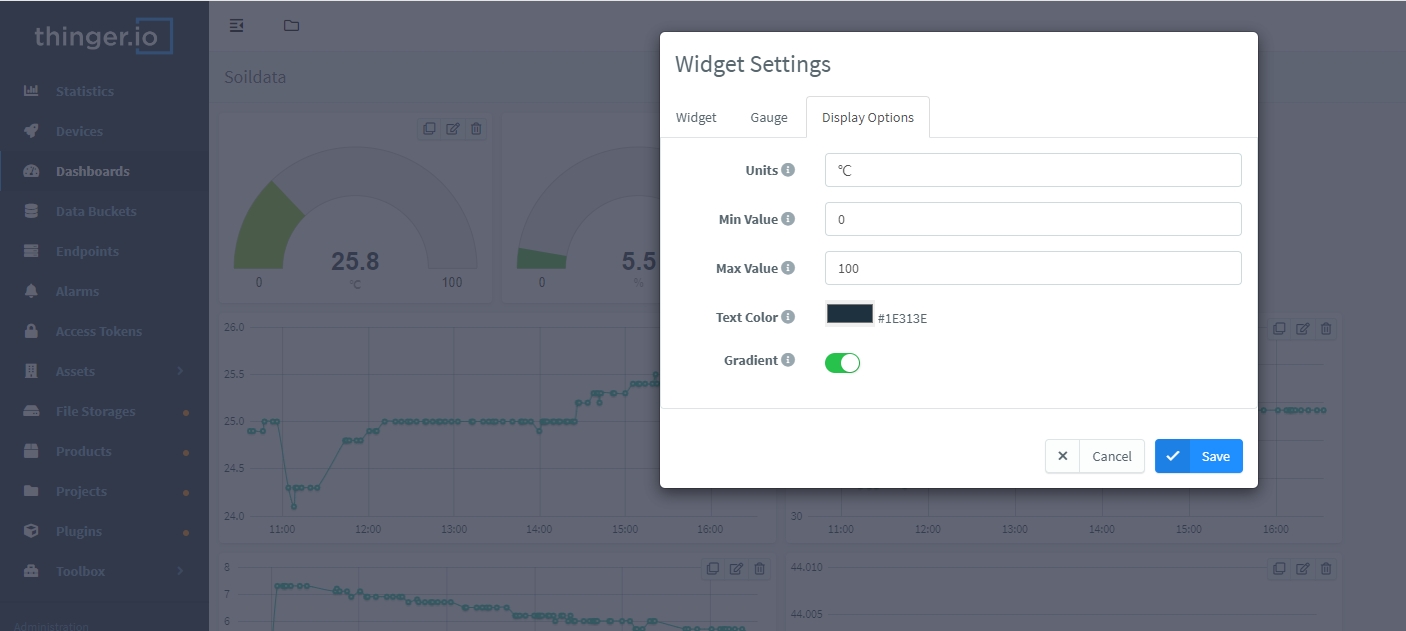
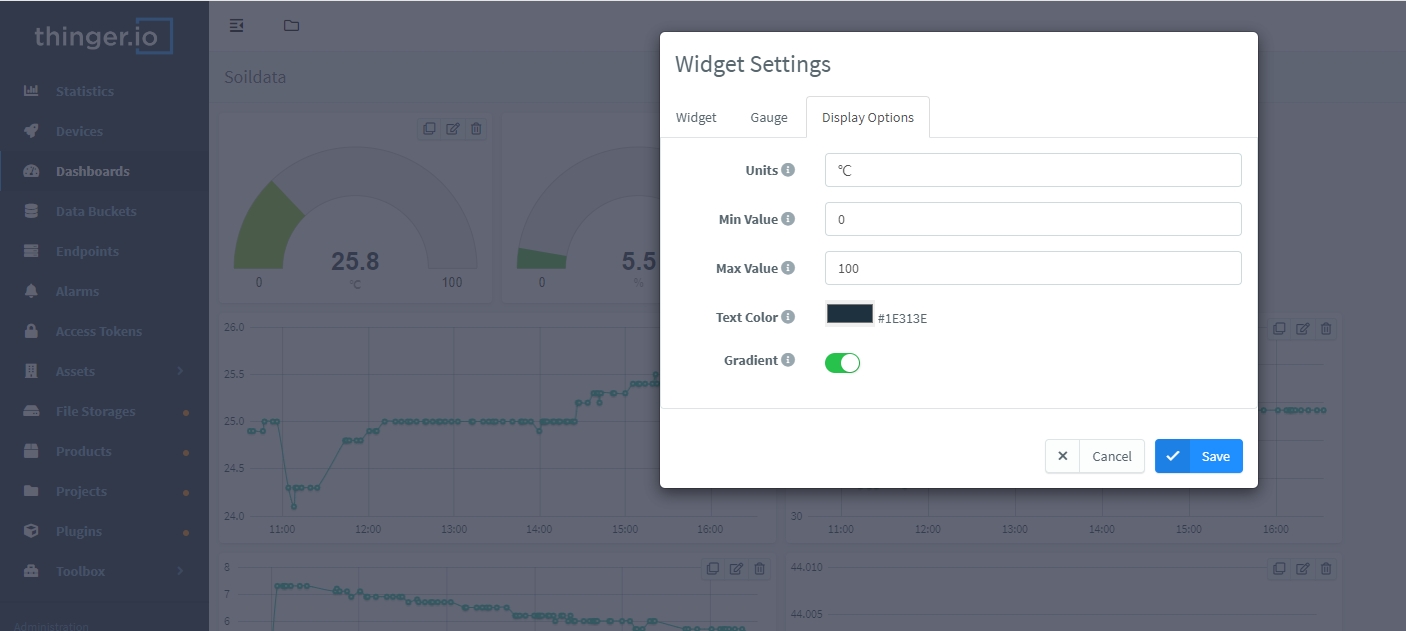
- Set the unit of measurement, maximum, and minimum values.
Data Display: Once set up, data will be displayed on the dashboard.
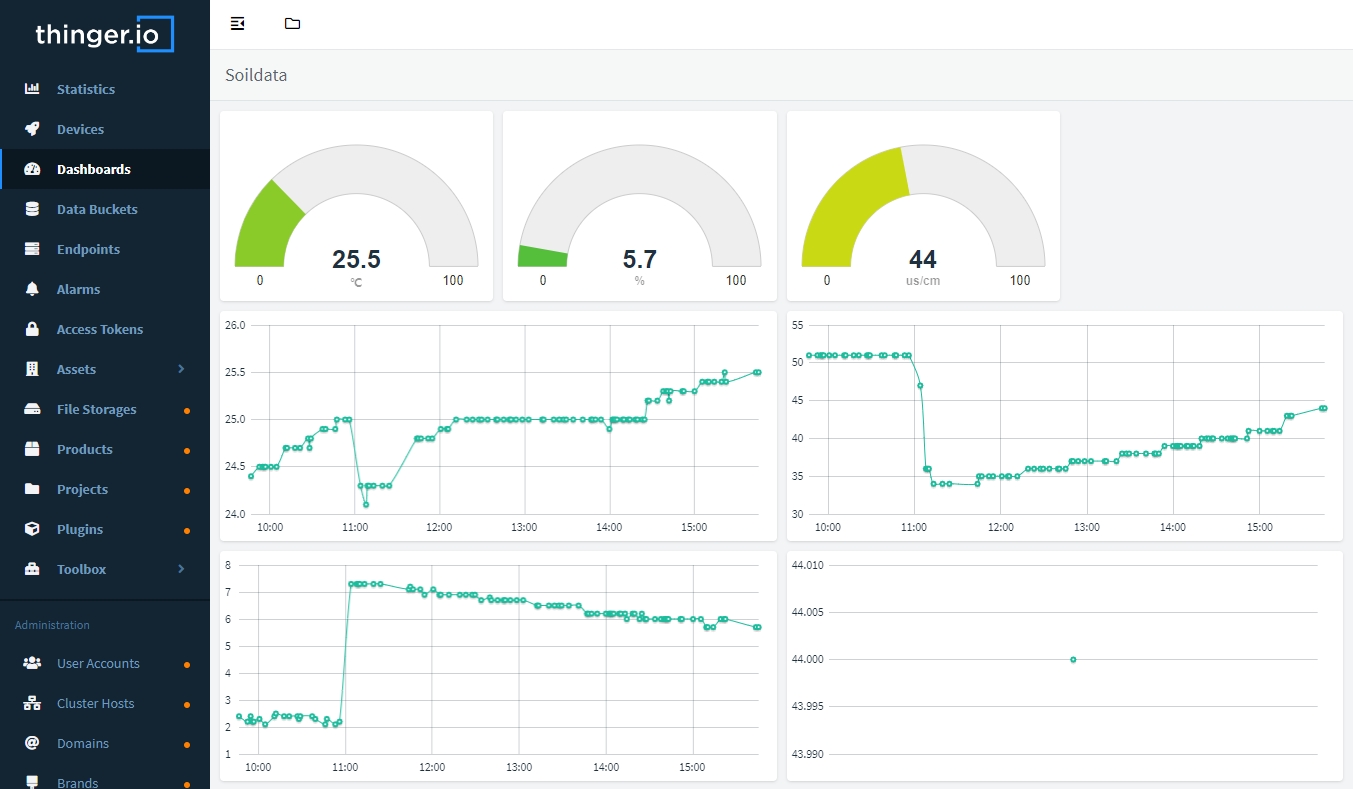
Final Debugging:
- If data is not displayed, check:
- Whether the topic format is correct.
- Whether the device token is valid.
- Whether the message format is correct (e.g., JSON).
![]() How to Connect NiuBoL Sensor to Thinger IoT Platform via MQTT Protocol.pdf
How to Connect NiuBoL Sensor to Thinger IoT Platform via MQTT Protocol.pdf
Prev:Standards and Requirements for Weather Station Equipment Construction
Next:NiuBoL sensor interfaces with the akenza.io platform via the MQTT protocol
Related recommendations
Sensors & Weather Stations Catalog
Agriculture Sensors and Weather Stations Catalog-NiuBoL.pdf
Weather Stations Catalog-NiuBoL.pdf
Related products
 Combined air temperature and relative humidity sensor
 Soil Moisture Temperature sensor for irrigation
 Soil pH sensor RS485 soil Testing instrument soil ph meter for agriculture
 Wind Speed sensor Output Modbus/RS485/Analog/0-5V/4-20mA
 Tipping bucket rain gauge for weather monitoring auto rainfall sensor RS485/Outdoor/stainless steel
 Pyranometer Solar Radiation Sensor 4-20mA/RS485
Screenshot, WhatsApp to identify the QR code
WhatsApp number:+8615367865107
(Click on WhatsApp to copy and add friends)
