


— Blogs —
—Products—
 Consumer hotline +8618073152920
 WhatsApp:+8615367865107
Address:Room 102, District D, Houhu Industrial Park, Yuelu District, Changsha City, Hunan Province, China
Technical Support
Time:2024-06-29 21:07:28 Popularity:4715
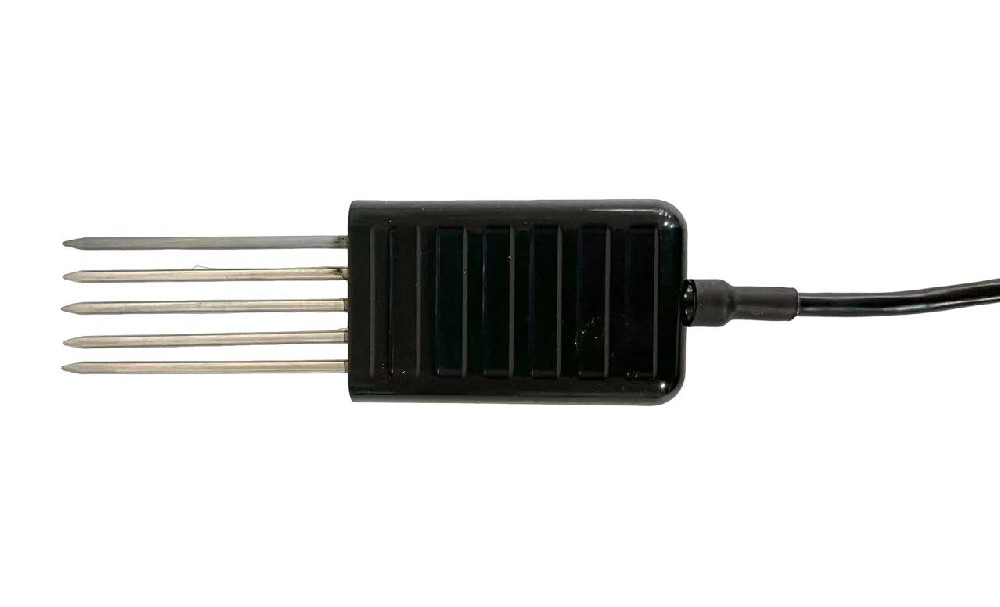
8 in 1 Soil moisture sensor Rs485 for arduino
In this guide, we will explore how to interface a 8 in1 Soil Moisture & Temperature Sensor with Arduino using the RS485 protocol. This setup will allow us to monitor the moisture content and temperature of the soil, which are crucial parameters for agriculture and gardening.
Soil moisture sensors measure the volumetric water content in soil. By understanding the moisture levels, farmers and gardeners can make informed decisions about irrigation, ensuring optimal plant growth. The temperature of the soil also plays a significant role in plant health, affecting root growth and nutrient uptake.
For this project, we will utilize the Niubol 8 in1 Soil Moisture & Temperature Sensor, which is specifically designed for in-ground measurements.
Therefore we are using Industrial Grade Soil Sensor for this project. To interface the sensor with the Arduino, we will use the RS485 communication protocol. The data from the Soil Moisture & Temperature Sensor will be presented on an OLED screen connected to the Arduino.
Here are the 4 wires for the sensor:
Brown Wire: VCC (5V-24V)
Black Wire: GND
Yellow Wire: RS485-A
Blue Wire: RS485-B
Requirements:
Hardware
DFRduino UNO R3 (or similar) x 1
RS485 Shield for Arduino x1
RS485 Soil Sensor(Temperature & Moisture & EC & Salinity & Ph & NPK) x 1
Software:
Arduino IDE
Here is a connection mapping between MAX485 & Soil Humidity Temperature Sensor.
VCC -> 5V (Soil Sensor)
GND -> GND (Soil Sensor)
A (MAX485) -> Soil Sensor A Pin (Yellow Color)
B (MAX485) -> Soil Sensor B Pin (Blue Color)
Soil Humidity Temperature Sensor Connection with Arduino. You may use a breadboard for assembly and a jumper wires for connecting the sensor and RS485 Module with Arduino.
Source Code/Program for Reading 8 in1 Soil Moisture & Temperature
 Source Code Program for Reading Soil Moisture sensor.txt
#include <SoftwareSerial.h>
// Define the pins for RS485 communication
#define RO 2
#define DI 3
#define RE 8
#define DE 7
#define RESPONSE_FRAME_SIZE 21
char sensorDataTextBuffer[200];
struct SoilSensorData
{
bool isSensorTimeout {false};
bool isValid {false};
float temperature {-1.0};
float humidity {-1.0};
unsigned int conductivity {-1};
float ph {-1.0};
unsigned int nitrogen {-1};
unsigned int phosphorus {-1};
unsigned int potassium {-1};
unsigned int salinity {-1};
};
class SoilSensor
{
public:
SoilSensor()
{
modbus = new SoftwareSerial(RO, DI);
}
void initialise()
{
Serial.begin(9600); // Initialize serial communication for debugging
modbus->begin(9600); // Initialize software serial communication at 9600 baud rate
pinMode(RE, OUTPUT); // Set RE pin as output
pinMode(DE, OUTPUT); // Set DE pi
}
void sendDataRequest()
{
digitalWrite(DE, HIGH);
digitalWrite(RE, HIGH);
delay(10);
// Send the request frame to the soil sensor
modbus->write(soilSensorRequest, sizeof(soilSensorRequest));
}
SoilSensorData read()
{
SoilSensorData soilSensorData;
// End the transmission mode and set to receive mode for RS485
digitalWrite(DE, LOW);
digitalWrite(RE, LOW);
delay(10);
//Wait for the response from the sensor or timeout after 1 second
unsigned long startTime = millis();
while (modbus->available() < RESPONSE_FRAME_SIZE && millis() - startTime < 1000)
{
delay(1);
}
if (modbus->available() >= RESPONSE_FRAME_SIZE) // If valid response received
{
// Read the response from the sensor
byte index = 0;
while (modbus->available() && index < RESPONSE_FRAME_SIZE)
{
soilSensorResponse[index] = modbus->read();
index++;
}
soilSensorData = computeData();
}
else
{
soilSensorData.isSensorTimeout = true;
}
return soilSensorData;
}
~SoilSensor()
{
if (modbus != nullptr) delete modbus;
delete[] soilSensorResponse;
}
private:
const byte soilSensorRequest[8] = {0x01, 0x03, 0x00, 0x00, 0x00, 0x08, 0x44, 0x0C};
SoftwareSerial* modbus = nullptr;
byte soilSensorResponse[RESPONSE_FRAME_SIZE];
int convertBytesToDecimal(unsigned int offset)
{
return soilSensorResponse[offset] * 256 + soilSensorResponse[offset + 1];
}
SoilSensorData computeData() const
{
SoilSensorData soilSensorData;
if (soilSensorResponse[0] != 1 || soilSensorResponse[1] != 3 || soilSensorResponse[2] != 16)
{
soilSensorData.isValid = false;
return soilSensorData;
}
soilSensorData.isValid = true;
soilSensorData.temperature = convertBytesToDecimal(3) / 10.0; //degrees celcius
soilSensorData.humidity = convertBytesToDecimal(5) / 10.0; // percent
soilSensorData.conductivity = convertBytesToDecimal(7); // microSiemens per centimetre
soilSensorData.ph = convertBytesToDecimal(9) / 100.0;
soilSensorData.nitrogen = convertBytesToDecimal(11); // miligram per Kilogram
soilSensorData.phosphorus = convertBytesToDecimal(13); // miligram per Kilogram
soilSensorData.potassium = convertBytesToDecimal(15); // miligram per Kilogram
soilSensorData.salinity = convertBytesToDecimal(17); // miligram per Kilogram
return soilSensorData;
}
};
SoilSensor soilSensor;
void writeSensorDataToString(SoilSensorData & sensorData)
{
if (sensorData.isSensorTimeout)
{
sprintf(sensorDataTextBuffer, "Incomplete data or sensor time out");
}
else
{
if (sensorData.isValid)
{
char* tempStr = malloc(6 * sizeof(char));
char* humidityStr = malloc(6 * sizeof(char));
char* phStr = malloc(6 * sizeof(char));
dtostrf(sensorData.temperature, 4, 1, tempStr);
dtostrf(sensorData.humidity, 4, 1, humidityStr);
dtostrf(sensorData.ph, 4, 2, phStr);
auto conductivity = sensorData.conductivity;
auto n = sensorData.nitrogen;
auto p = sensorData.phosphorus;
auto k = sensorData.potassium;
auto salinity = sensorData.salinity;
sprintf(sensorDataTextBuffer, "Temperature: %s; Humidity: %s; Conductivity: %u; PH: %s; N: %u; P: %u; K: %u; Salinity: %u", tempStr, humidityStr, conductivity, phStr, n, p, k, salinity);
if (tempStr != NULL) free(tempStr);
if (humidityStr != NULL) free(humidityStr);
if (phStr != NULL) free(phStr);
}
else
{
sprintf(sensorDataTextBuffer, "Data read from sensor is invalid");
}
}
}
void setup()
{
soilSensor.initialise();
}
void loop()
{
soilSensor.sendDataRequest();
SoilSensorData sensorData = soilSensor.read();
writeSensorDataToString(sensorData);
Serial.println(sensorDataTextBuffer);
delay(2000); // Wait for a second before the next loop iteration
}
Thanks to Phil Ogun for the code!
The 8-in-1 Soil Sensor is a sensor that integrates multiple parameters such as temperature, humidity, conductivity, NPK, salinity, and PH. With such a sensor, users can easily access multiple key data of the soil, helping them to better understand the condition of the soil and make adjustments and decisions accordingly.
By measuring the dielectric constant of soil, it can directly and stably reflect the real moisture content of various soils. It is suitable for soil moisture monitoring, scientific experiments, water-saving irrigation, greenhouses, flowers and vegetables, grass pastures, soil quick test, plant cultivation, sewage treatment, fine agriculture and other occasions. The sensor's input power supply, sensing probe, signal output three parts are completely isolated, safe and reliable, beautiful appearance, easy to install, the probe is made of stainless steel, corrosion resistance, stable performance.
1.NBL-S-THR Soil Temperature Moisture Sensor datasheet
 NBL-S-THR-Soil-temperature-and-moisture-sensors-Instruction-Manual-V4.0.pdf
2. NBL-S-TMC Soil Temperature Moisture EC Sensor datasheet
NBL-S-TMC-Soil-temperature-and-moisture-conductivity-sensor.pdf
3. NBL-S-TM Soil Temperature Moisture Sensor datasheet
NBL-S-TM-Soil-temperature-and-moisture-sensor-Instruction-Manual-4.0.pdf
4. NBL-S-TMCS Soil Temperature, Moisture, Conductivity and Salinity Integrated Sensor
NBL-S-TMCS-Soil-Temperature-Humidity-Conductivity-and-Salinity-Sensor.pdf
5. NBL-S-TMCS-7 Soil Temperature, Moisture, NPK, Conductivity and pH Integrated Sensor
7-in-1-Soil-Composite-Sensor-Manual.pdf
4. NBL-S-TMCS-8 Soil Temperature, Moisture, NPK, pH, Conductivity and Salinity Integrated Sensor
Related recommendations
Sensors & Weather Stations Catalog
Agriculture Sensors and Weather Stations Catalog-NiuBoL.pdf
Weather Stations Catalog-NiuBoL.pdf
Agriculture Sensors Catalog-NiuBoL.pdf
Related products
 Combined air temperature and relative humidity sensor
 Soil Moisture Temperature sensor for irrigation
 Soil pH sensor RS485 soil Testing instrument soil ph meter for agriculture
 Wind Speed sensor Output Modbus/RS485/Analog/0-5V/4-20mA
 Tipping bucket rain gauge for weather monitoring auto rainfall sensor RS485/Outdoor/stainless steel
 Pyranometer Solar Radiation Sensor 4-20mA/RS485

Screenshot, WhatsApp to identify the QR code
WhatsApp number:+8615367865107
(Click on WhatsApp to copy and add friends)

